Easy Origami Fish: Fun Paper Craft for Kids
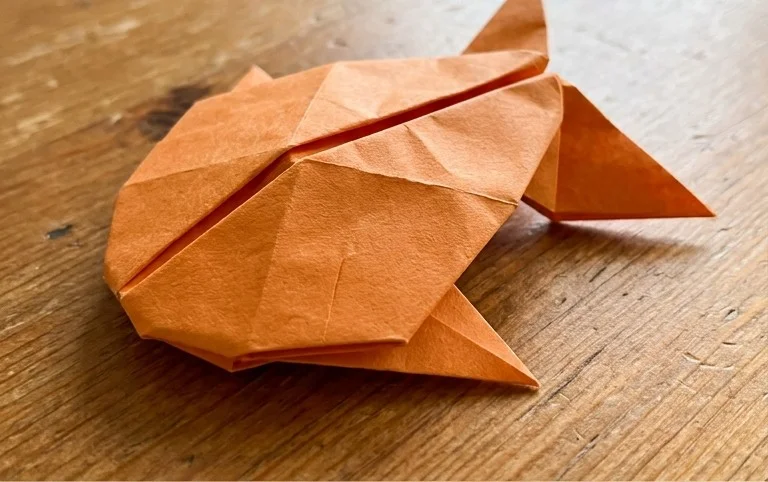
Easy Origami Fish – let’s dive into the wonderful world of paper folding and create our very own cute, little swimmer! This project is perfect for absolute beginners, especially kids, and will result in a charming, simple fish with a neat little tail and a friendly body that’s ready to swim off your page.
Whether you’re looking for a fun activity to do with the little ones, a quick craft for a rainy afternoon (it only takes about 5-10 minutes per fish!), or even a sweet handmade gift or decoration, this easy peasy origami fish is the perfect choice. You’ll learn just a few basic folds that are super easy to master, and before you know it, you’ll have a whole school of them!
Get ready to transform a simple square of paper into something magical. Let’s get folding!
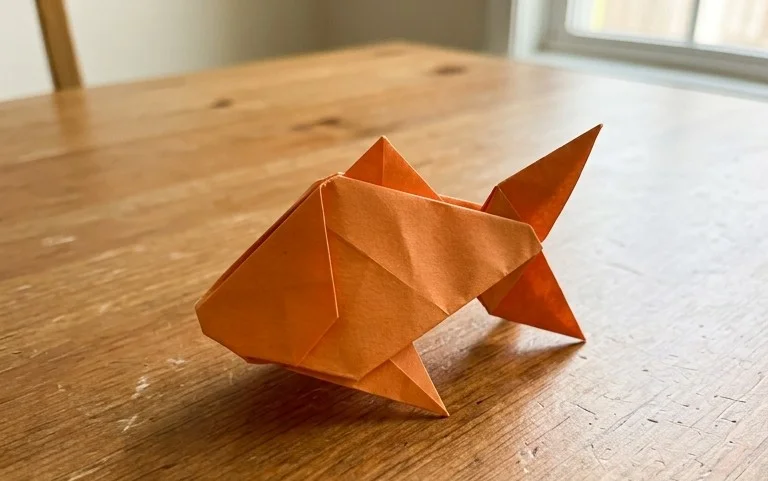
Easy Origami Fish – Origami for Kids – Easy Peasy and Fun
Hello there, wonderful origami adventurers! I’m so excited to guide you through making a super cute and ridiculously easy origami fish. This is a perfect project for beginners, especially kids, because it’s simple, quick, and the result is instantly rewarding. We’ll go step-by-step, and I’ll explain everything clearly so you can make a whole school of these little swimmers in no time. Get ready for some easy peasy fun!
Choosing Your Paper: The Foundation of Your Fishy Friend
Before we start folding, let’s talk about paper. The right paper can make all the difference between a wobbly fish and a sleek, happy one!
- Type of Paper: For this easy fish, standard origami paper is your best friend. It’s thin enough to fold neatly without becoming too bulky, and it holds creases really well. If you don’t have dedicated origami paper, plain printer paper is a good substitute, though it might be a bit stiffer. Avoid cardstock or very thick paper, as it will be difficult to fold accurately and make sharp creases.
- Weight: Origami paper is typically around 70-90 gsm (grams per square meter). This weight is ideal. Printer paper is usually around 80 gsm, so that works perfectly fine.
- Size: For your first fish, I recommend starting with a square piece of paper that’s at least 6 inches by 6 inches (about 15 cm by 15 cm). This size is easy to handle and see your folds clearly. As you get more confident, you can try smaller sizes for more delicate fish, or larger sizes for bigger ones.
- Single or Double Sided: Origami paper often comes with one side coloured and the other white. For this fish, you can use either single-sided or double-sided paper. If you use single-sided paper, the white side will be on the inside of your fish, and the colour will be on the outside. If you use double-sided paper (both sides coloured), your fish will be colourful all the way through! Both look great, so choose whichever you have or prefer.
The Base Folds: Building Blocks of Origami
We’ll be using a couple of fundamental origami folds to create our fish. Getting these right will make the whole process smoother.
- Valley Fold: This is the most common fold. Imagine you’re folding a piece of paper in half to make a book. The crease you create forms a “valley” on the side you’re looking at. When I say “fold in half,” I usually mean a valley fold. Make sure to run your fingernail along the crease to make it sharp.
- Mountain Fold: This is the opposite of a valley fold. Imagine you’ve folded the paper in half and then unfolded it. The crease now sticks *up* like a mountain. Sometimes we’ll fold in a way that creates a mountain fold.
- Creasing: For all folds, the key to clean origami is sharp creases. After you bring the edges or corners together, run your fingernail firmly along the fold line. This makes your model crisp and helps it hold its shape.
Let’s Get Folding! Your Step-by-Step Origami Fish
Ready to bring our fishy friend to life? Grab your square piece of paper. Make sure the coloured side is facing up if you’re using single-sided paper. Let’s begin!
- Prepare the Paper: Start with your square piece of paper. If it’s coloured on one side, place it coloured-side up.
- Diagonal Fold: Take the bottom right corner of the paper and bring it all the way up to meet the top left corner. Press down firmly to make a sharp crease along the diagonal line. You should now have a triangle.
- Unfold: Gently unfold the paper back to its original square shape. You should see a diagonal crease running from the top left to the bottom right.
- Second Diagonal Fold: Now, take the bottom left corner and bring it up to meet the top right corner. Crease firmly along this new diagonal line. You’ll have another triangle.
- Unfold Again: Unfold the paper back into a square. You should now have two diagonal creases forming an ‘X’ on your paper.
- Fold in Half (Vertically): Turn the paper over so the coloured side is now facing down. Take the bottom edge of the square and bring it up to meet the top edge. Crease firmly. You’ll have a rectangle.
- Unfold: Unfold the paper back into a square. You should see a horizontal crease running across the middle.
- Fold in Half (Horizontally): Now, take the left edge of the square and bring it over to meet the right edge. Crease firmly. You’ll have another rectangle.
- Unfold: Unfold the paper back into a square. You should now have both a horizontal and a vertical crease, dividing your square into four smaller squares. Your paper should have creases that look like an ‘X’ and a ‘+’.
- Collapse into a Square Base: This is a fun step! Turn the paper back over so the coloured side is facing up again. Look at the horizontal crease. Gently push the left and right sides inwards along this crease. The top and bottom edges will naturally come together. As they do, flatten the paper down. You should end up with a smaller square, with four flaps. This is called a Square Base. The open edges of the flaps should be at the bottom.
- Fold the Side Flaps (First Side): Take the top layer of the right flap. Bring its outer edge to meet the centre vertical crease. Crease sharply. Now, take the top layer of the left flap. Bring its outer edge to meet the centre vertical crease. Crease sharply. Your top point should now be slightly narrower and look a bit like a kite shape on top.
- Fold Down the Top Triangle: Look at the pointy bit at the very top of the kite shape you just made. Fold this little triangle down so the tip touches where the two flaps you just folded meet the centre crease. Crease it well.
- Unfold the Last Three Folds: Now, gently unfold the two side flaps you just folded to the centre, and unfold the small triangle you just folded down. You should see these crease marks on the top flap.
- Petal Fold (First Side): This is a slightly trickier fold, but you can do it! Lift the bottom point of the top flap upwards, opening it up along the creases you just made. As you lift it, use the horizontal crease you made in step 12 as a guide. The sides should naturally fold inwards along the creases you made in steps 11. Flatten everything down so you have a diamond shape on top. This is called a Petal Fold.
- Flip and Repeat: Carefully flip your entire model over. Repeat steps 11 through 14 on this new side. You’ll fold the outer edges to the centre, fold down the top triangle, unfold them all, and then perform the petal fold. You should now have a diamond shape on both sides of your model, with two “legs” sticking out at the bottom.
- Fold Up the “Legs”: Look at the two points (the “legs”) sticking out at the bottom of your diamond shape. Take the right leg and fold it upwards. The tip of this leg should go past the top point of the diamond. Crease firmly.
- Repeat with the Other Leg: Take the left leg and fold it upwards in the same way, so its tip also goes past the top point of the diamond. Crease firmly.
- Flip the Model: Carefully flip your entire model over.
- Form the Tail: You’ll see one of the “legs” you just folded is now sticking up. This will be the tail of your fish. Fold this “tail” down towards the back of the fish. The amount you fold it down will determine how big the tail is. Crease well.
- Form the Head/Mouth: Look at the other end of the fish (the pointy end). Gently pull the two points at this end apart a little. This will create the mouth and head of your fish. You can adjust how much you pull them apart to make the mouth wider or narrower.
- You’ve Made a Fish!: Congratulations! You’ve successfully folded an origami fish! You can gently shape its body to make it look more rounded if you like.
Common Pitfalls and How to Avoid Them
Don’t worry if your first fish isn’t perfect. We all make mistakes when learning, and it’s part of the fun! Here are a couple of places beginners often stumble and how to steer clear:
- Messy Creases: This is probably the most common issue. If your creases aren’t sharp, your model won’t hold its shape well, and it might look a bit saggy.
- How to Avoid: Make sure you are pressing down firmly on every single fold. Use your fingernail to really “score” the paper along the fold line. Don’t be shy! If you’re using thicker paper, you might need to use a ruler edge or a bone folder (if you have one) for extra sharp creases.
- Misaligned Corners/Edges: When you’re folding edges to meet other edges or corners to meet corners, if they aren’t perfectly aligned, your model will be a bit lopsided.
- How to Avoid: Take your time in steps 2, 4, 6, 8, 11, and 14. Before you crease, hold the edges or corners together with one hand and check that they line up perfectly. A tiny bit of off-alignment at the beginning can lead to a much bigger difference by the end.
- Difficulty with the Petal Fold (Step 14): This is often the first “advanced” fold for beginners. It can feel a bit confusing to get all the layers to work together.
- How to Avoid: Go back and look at the creases you made in step 11. These are your guides. When you lift the bottom point up in step 14, imagine you are opening up the paper along those creases. The sides should naturally want to fold inwards. Sometimes, gently helping them with your fingers as you flatten the shape can make it easier. If it’s really not working, unfold and re-crease step 11 clearly.
Varying Your Fish: Get Creative!
Once you’ve mastered the basic fish, the fun really begins! Here are some ways to make your fish unique:
- Size: As I mentioned, start with a 6-inch square. But what happens if you use a tiny 3-inch square? You get a school of mini-fish! Or use a large 12-inch square for a statement fish.
- Paper Pattern and Colour: This is where you can really let your personality shine!
- Patterns: Use paper with fish patterns, polka dots, stripes, or even just pretty colours.
- Double-Sided Paper: If you have paper that’s a different colour on each side, you can get interesting effects. For example, if one side is blue and the other is yellow, you might get a greenish tint to your fish, or the tail might be a different colour to the body.
- Textured Paper: Try some textured origami paper for a different feel.
Displaying and Gifting Your Origami Fish
What do you do with your fabulous fish once they’re made? Here are some ideas!
- Make a School: Fold several fish in different sizes and colours. Arrange them on a shelf or a table to look like they’re swimming together.
- Mobile: Punch a small hole at the top of each fish and string them together with fishing line or thread to create a beautiful, flowing mobile for a bedroom or nursery.
- Greeting Cards: Glue a small origami fish onto a homemade greeting card. It adds a lovely, personal touch!
- Decorations: Use them to decorate a party table, a gift box, or even a bulletin board.
- Gifts: These fish make wonderful little gifts for friends, family, or classmates. They’re a thoughtful, handmade present that’s sure to be appreciated. You could even put them in a small clear bag with a little tag.
I hope you had as much fun making your origami fish as I did showing you how. Keep practicing, keep experimenting, and most importantly, keep having fun with origami!
Conclusion
Congratulations on creating your very own easy origami fish! We hope you had a wonderful time making this simple yet beautiful paper creation. Don’t worry if your first attempt isn’t perfect; every origami artist started with practice. The joy is in the folding! We encourage you to share your finished origami fish with friends and family – they’ll be amazed by your skills. For your next paper adventure, why not try an origami frog or a jumping origami grasshopper? There are so many delightful paper projects waiting for you to discover. Keep folding and keep exploring!