Easy Coffee Filter Dancers: Step-by-Step Origami Craft
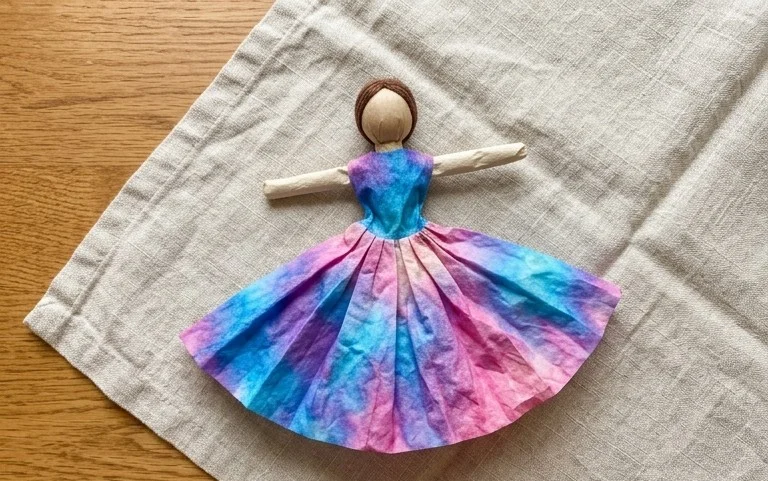
How to Make Coffee Filter Dancers – Get ready for some truly magical, fluttery fun! In this tutorial, we’re going to transform ordinary coffee filters into delicate, dancing figures that twirl and sway with the slightest breeze. Imagine a bouquet of these ethereal creations, each one a unique little performer with a flowing skirt that looks like it’s made of pure silk, ready to waltz around your room. These are perfect for complete beginners and kids alike, and they make the most charming decorations or thoughtful, handmade gifts. You’ll be amazed at how quickly you can create a whole troupe in under 30 minutes! We’ll go step-by-step, learning a few simple folds that bring these graceful dancers to life. Let’s get our hands busy and create some paper magic together!
How to Make Coffee Filter Dancers
Hello fellow crafters! Today, we’re going to embark on a delightful origami journey to create something truly magical: Coffee Filter Dancers! These delicate and whimsical figures are surprisingly easy to make, and they bring a wonderful touch of artistry to any space. They’re perfect for little hands to help with, a relaxing solo project, or even a unique handmade gift. Let’s get started!
Choosing Your Paper
The star of our show is, as the name suggests, the humble coffee filter. But not just any coffee filter will do. For the best results, I recommend using standard basket-style paper coffee filters. These are typically thin, porous, and readily available.
* **Type:** Standard basket-style paper coffee filters. Avoid bleached filters if you’re aiming for a more natural look, though bleached ones work perfectly fine too. Cone-shaped filters are usually too thick and stiff for this project.
* **Weight:** The beauty of coffee filters is their inherent lightness. You don’t need to worry about specific paper weights as you would with traditional origami paper. Their thinness allows them to drape and flow beautifully.
* **Size:** Most standard coffee filters will work well. The typical size you find in grocery stores is perfect. If you happen to find extra-large or unusually small ones, they can be used, but the proportions of the dancer will change.
* **Single or Double-Sided:** This is a great question! Coffee filters are essentially single-sided in terms of colour or pattern. You’ll be working with the natural colour of the filter, which is usually a light brown or white. This simplicity is part of their charm!
Base Folds: The Foundation of Your Dancer
Before we dive into the specific steps for our dancer, let’s get familiar with the fundamental folds we’ll be using. These are simple, but mastering them will ensure your dancer is elegant and stable.
* **Valley Fold:** Imagine folding the paper so that the crease forms a “valley.” You’re bringing one edge or corner to meet another, and the paper bends downwards along the crease. When you look at the fold from the top, it looks like a V.
* **Mountain Fold:** This is the opposite of a valley fold. You’re folding the paper so the crease forms a “mountain peak.” The paper bends upwards along the crease. When you look at the fold from the top, it looks like an inverted V or an upside-down U.
To make these folds cleanly, always take your time. Align the edges or corners precisely before pressing down firmly along the crease. You can use your fingernail or a bone folder (if you have one) to get sharp, crisp lines. This attention to detail will make subsequent steps much easier and your final dancer much more polished.
The Fold Sequence: Bringing Your Dancer to Life
Now, let’s get folding! We’ll assume you have a standard basket-style coffee filter in front of you, with the opening at the top and the pointed end at the bottom.
1. **Prepare the Filter:** Gently open the coffee filter so it lays flat, forming a sort of cone shape with a round, gathered top and a pointed bottom. Let’s call the gathered edge the “top edge” and the pointed tip the “bottom tip.” The inside of the filter should be facing up.
2. **First Pleat (The Skirt Base):** Take the bottom tip of the filter and fold it upwards, so that the tip meets the center of the top edge. Press this fold firmly to create a horizontal crease. This fold helps to give the dancer a more structured base for its skirt.
3. **Second Pleat (Refining the Skirt):** Now, take the same bottom tip that you just folded up, and fold it downwards this time. The goal is to bring this tip down to meet the center of the *new* bottom edge that was created by your first fold. This creates a smaller, more defined pleat at the bottom of the filter. Press this fold firmly.
4. **The Center Fold (Body Formation):** Pick up the filter and fold it in half vertically, bringing the left side to meet the right side. The pleats you just made should be on the outside. You should now have a shape that looks like a long, thin cone with a rounded top. Press this central fold very firmly. This fold is crucial for forming the dancer’s body.
5. **Forming the Arms (First Side):** With the folded edge on the left and the open edges on the right, locate the top layer of the paper on the right side. Gently pull this layer outwards and downwards, at an angle. You want to create an arm shape that extends out from the body. The angle of this fold will determine how the arm looks. Aim for a graceful curve. Don’t pull too hard, or you might tear the filter.
6. **Forming the Arms (Second Side):** Now, flip the entire model over. Repeat step 5 on the other side, mirroring the angle of the first arm. Try to make the arms as symmetrical as possible for a balanced look.
7. **Shaping the Head:** Look at the very top of your folded model, where the gathered edge of the coffee filter is. You can gently curl or pinch this area to create a suggestion of a head. Sometimes, simply letting it naturally fan out is enough. You can also gently pull on the layers at the top to create a more defined “hair” or “bonnet” look.
8. **The Final Flourish:** Gently unfurl the sides of your dancer. The two side folds you made for the arms will now become the “legs” or the flowing skirt. You can gently separate them and arrange them so the dancer can stand. The central fold forms the body, and the top part can be adjusted to look like a head or headdress.
And there you have it! Your very own Coffee Filter Dancer!
Common Pitfalls and How to Avoid Them
It’s completely normal to encounter a few little hiccups when you’re learning a new craft. Here are some common places beginners tend to go wrong with coffee filter dancers and how to navigate them:
* **Tearing the Paper:** Coffee filters are thin, and it’s easy to rip them if you pull too hard or too quickly, especially when forming the arms.
* **Avoidance:** Be gentle! When pulling out the arms, use a slow, steady motion. Think of coaxing the paper rather than yanking it. Ensure your folds are already well-creased; this adds a little strength to the paper.
* **Uneven Arms:** When forming the arms, it’s easy for one to end up higher, lower, or at a different angle than the other. This can make your dancer look a bit lopsided.
* **Avoidance:** Take your time during steps 5 and 6. After you make the first arm, hold your model up and look at it from the front. Try to visualize the second arm mirroring the first. Don’t be afraid to gently adjust or refold if it’s not quite right. Symmetry is key here!
* **Loose Folds:** If your creases aren’t sharp enough, especially the central fold (step 4), your dancer might not have a strong enough body and could appear floppy.
* **Avoidance:** Go back and reinforce your creases. Run your fingernail or a smooth, hard object firmly along the main folds. A well-defined central fold is the backbone of your dancer.
Varying Your Dancers: Get Creative!
The beauty of this project is how easily you can customize your dancers. Once you’ve mastered the basic fold, you can experiment!
* **Size:** While standard filters are great, try using larger or smaller ones to see how the proportions change. Larger filters might make for more dramatic, flowing dancers, while smaller ones can be incredibly delicate and cute.
* **Paper Pattern:** This is where things get really exciting! While coffee filters themselves aren’t usually patterned, you can get creative with the paper you use *before* you fold.
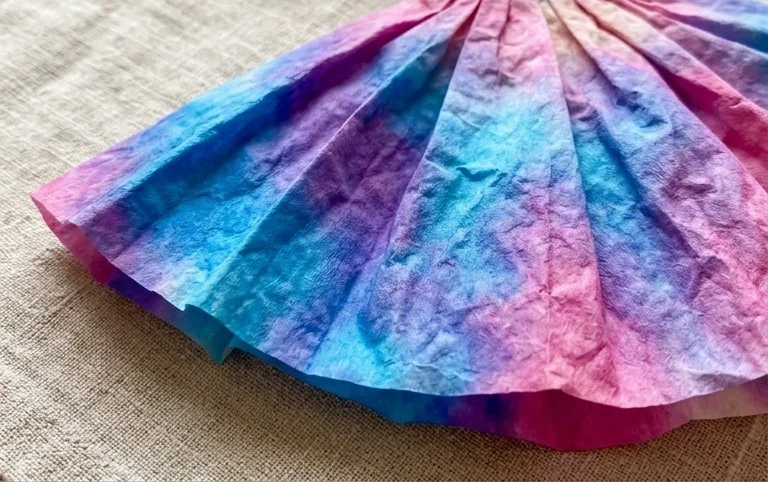
* **Dipped Dancers:** After folding your dancer, you can carefully dip the skirt portion into watered-down acrylic paints or fabric dyes for a beautiful ombre effect. Be sure to let them dry completely before handling further.
* **Stenciled or Stamped:** You could potentially stamp or stencil very light patterns onto the filter *before* folding, using a dry stamp or very light application of ink/paint. Test this on a scrap filter first, as the porous nature of the paper can make ink bleed.
* **Using Other Papers:** If you can find thin, lightweight paper that mimics the texture and foldability of a coffee filter, you could try those! Think about very thin tissue paper or even specialized origami papers that are extremely lightweight. However, the characteristic drape of a coffee filter is hard to replicate perfectly.
* **Colour:** As mentioned, you can dye or paint the filters. Alternatively, look for coloured coffee filters if you can find them! Sometimes, specialty stores or online retailers offer them in various hues.
Displaying and Gifting Your Creations
Your finished coffee filter dancers are little works of art, and they deserve to be showcased!
* **Mobile Magic:** String several dancers together with fishing line or thin thread to create a beautiful, delicate mobile. Hang it near a window where the light can catch them, or above a crib or a reading nook.
* **Tabletop Beauties:** Arrange them on a shelf, a mantelpiece, or a side table. Their unique, airy form adds a whimsical touch.
* **Party Decorations:** Use them as unique centerpieces for a tea party, a fairy-themed birthday, or any celebration where a touch of enchantment is desired.
* **Gift Toppers:** Attach a single dancer to a gift package for a personal and artistic touch. It’s a little surprise that shows you’ve put extra thought into the present.
* **Care Packages:** A small collection of these dancers can bring a smile to someone’s face in a get-well package or a thinking-of-you box.
* **Gifting as a Set:** Package a few dancers together in a small box or bag, perhaps with a handwritten note about how they were made with care.
Making coffee filter dancers is a wonderfully simple yet rewarding craft. They teach us patience, attention to detail, and the joy of transforming everyday materials into something beautiful. I hope you enjoy creating your own ethereal dancers as much as I do! Happy folding!
Conclusion
Congratulations on creating your very own coffee filter dancers! Don’t worry if your first attempt wasn’t perfect; every origami artist knows that practice makes perfect. The beauty of this project is its simplicity and the delightful movement of the finished model. We encourage you to try this fun paper craft again and perhaps even share your graceful dancers with friends and family!
For your next creative adventure, consider trying a few variations. You could experiment with different sized coffee filters to create a whole troupe of dancers, or even use colored filters for a vibrant display. There are so many exciting paper projects waiting for you to explore!